These instructions apply to the Suzuki Vitara Mk4 (LY) 2015-2024.
For other models, please choose your vehicle here.
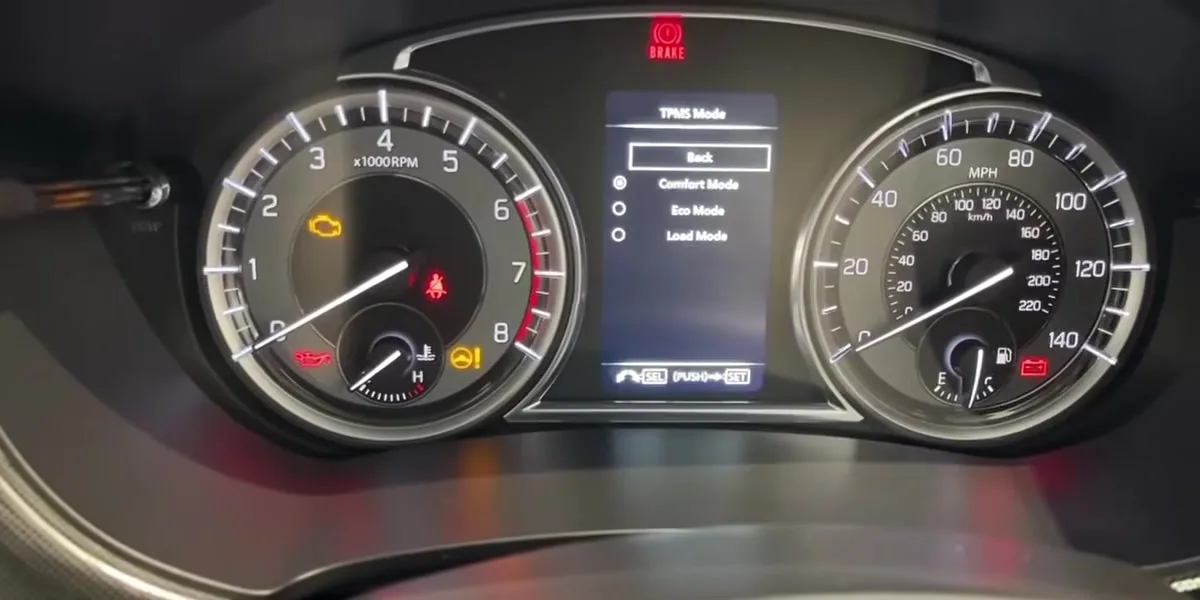
When the tyre-pressure warning light comes on in your Suzuki Vitara Mk4 (LY, 2015–2024), it usually just means the system needs to store your current pressures as the new reference after a check, top-up or wheel change. The Vitara stores them through the instrument-cluster menu using the indicator selector knob on the cluster. This guide shows how — including the Comfort/Eco/Load pressure modes that are easy to get wrong.
Suzuki Vitara tyre pressures
The recommended cold tyre pressures for the Vitara (LY) are the same on both standard sizes, 215/60 R16 and 215/55 R17:
| Load | Front | Rear |
|---|---|---|
| Normal (Comfort) | 2.3 bar (33 psi) | 2.3 bar (33 psi) |
| Economy (Eco, petrol) | 2.8 bar (41 psi) | 2.6 bar (38 psi) |
| Fully loaded | 2.4 bar (35 psi) | 2.8 bar (41 psi) |
| Space-saver spare (T135/90 D16) | 4.2 bar (60 psi) | |
Set them cold, then select the matching Comfort, Eco or Load mode when you reset the system (below). The placard in your own driver’s door aperture is the final authority for your exact car.

When to Reset
- After checking or adjusting the tyre pressures (including seasonal changes).
- After changing one or more wheels or tyres.
- After disconnecting or renewing the battery.
Set Your Pressures First
The setting stores whatever pressures are in the tyres at that moment, so they must be correct first. Park on level ground and set all four (cold) to the figures on the placard in the driver’s door aperture. The Vitara’s placard lists more than one pressure set — note which one (comfort/economy/full-load) you have set, because you select the matching mode during the reset. Suzuki warns that if the loading, tyre pressures and the stored initial value do not match, the monitoring system will not work properly.
How to Reset the Vitara TPMS
- Make sure all four tyres are at the correct cold pressure for the loading you want.
- Turn the ignition on (engine can stay off) with the vehicle stationary.
- On the instrument cluster, push and hold the indicator selector knob for more than 3 seconds to enter the display’s setting mode.
- Rotate the knob (left or right) to highlight “TPMS”, then push the knob to select it.
- Rotate to “TPMS Mode” and push the knob.
- Rotate to the initial value that matches the pressures you set — “Comfort”, “Eco” or “Load” — and push the knob to store it. The display shows a confirmation message and the setting is complete.
Adjust the pressures while the tyres are cold, then drive for about 10 minutes: once the system recognises the pressures the warning light goes out. The TPMS relearns the tyre pressures during the first 10 minutes of driving, so the readout can take that long to appear.
Light Won’t Go Out? Work Through This
- A tyre is genuinely low: find and fix the leak, re-inflate to the cold figure, then drive to relearn.
Frequently Asked Questions
What are the Comfort, Eco and Load modes?
They correspond to the different recommended pressures on the door placard — lower for ride comfort, higher for economy or a full load. Select the mode that matches the pressures you actually set so the system uses the correct reference.
Where is the TPMS reset on a Vitara?
In the instrument-cluster setting menu: push and hold the indicator selector knob for more than 3 seconds, rotate to “TPMS” and push, then “TPMS Mode” and push, then pick the Comfort/Eco/Load initial value and push to confirm.
Do I have to drive after resetting?
Yes — after adjusting the cold pressures, drive for about 10 minutes so the system can relearn them, after which the warning light goes out.
Why does the light come back a few days later?
Either a tyre is slowly losing air, or it was a little low when you stored the value. Re-check all four cold pressures and set the initial value again.
After tyre or seasonal-wheel work it is worth confirming the service reminder is clear — see our Suzuki Vitara service indicator reset guide.
Independent guide — not affiliated with Suzuki. Always follow your official service manual and safety precautions. Read our full disclaimer.