While swapping a used 6.1L HEMI into my Charger, I pulled the engine’s original spark plugs before it went in. Laid out in order, they tell a small story about how the engine had been run — and they’re a perfect excuse to explain how to read used plugs, and why a HEMI has so many of them.
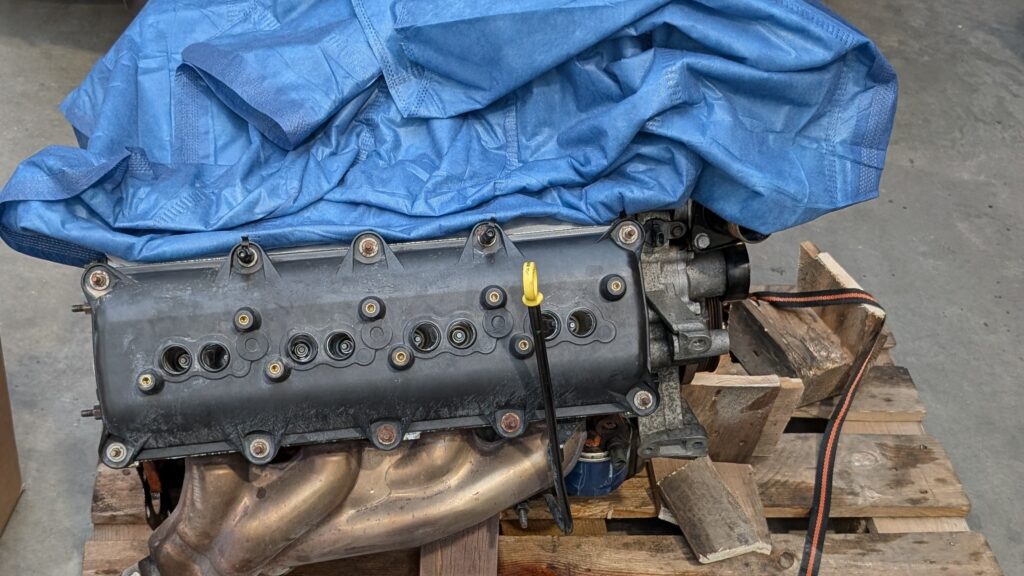
Why a 6.1 HEMI has 16 spark plugs
Most V8s use one plug per cylinder — eight in total. The modern HEMI uses two per cylinder, so a 5.7, 6.1 or 6.4 carries 16. It isn’t a gimmick. The HEMI’s combustion chamber is wide and shallow, and the intake and exhaust valves are so large that there’s no room for a plug in the centre where you’d normally put one. Firing the charge from a single edge would leave pockets of unburned fuel on the far side of the dome.
Two plugs, one on each side of the valves, light the mixture from both sides at once. The burn is faster and more complete, which means a smoother idle, a little less tendency to knock and — a big reason the design was adopted — cleaner emissions, because more of the fuel is actually burned. Eight ignition coils fire all sixteen plugs — each coil sparks both plugs in its own cylinder at the same time, one sitting directly under the coil and the other fed by a short lead. For anyone working on the engine, the practical takeaway is simple: you pull sixteen plugs, and you read them two at a time, per cylinder.
The right plug, gap and torque
The factory plug for the 6.1 is the NGK PLZTR5A-13, an NGK Laser Platinum. There’s a useful trick hiding in that part number: the -13 suffix is the gap — 1.3 mm, or about 0.050 in — and NGK ships them pre-gapped to it. Because the centre electrode is fine platinum, you don’t want to be levering the gap around with a feeler gauge; check it gently and leave it alone if it’s right.
When they go in, the numbers that matter are:
- Gap: 1.3 mm / 0.050 in (pre-set on the PLZTR5A-13).
- Torque: the factory figure is 11–15 lb-ft (15–20 N·m), and the manual is blunt about the ceiling — do not exceed 15. Over-tighten into the aluminium head and you can distort the plug, shift the gap or crack the porcelain insulator. Snug and correct beats tight.
- No anti-seize. NGK’s shells are already plated, and grease on the threads changes the effective torque — it’s an easy way to over-tighten or let a plug work loose. Fit them dry.
Pull them so they actually tell you something
A used plug is only useful as a diagnostic if you know where it came from. Before you start:
- Work one cylinder at a time and keep each cylinder’s pair together — both plugs from one hole, side by side.
- Lay them out in removal order, in a row, noting which bank they came from.
- Don’t wire-brush or wipe them until you’ve looked — the deposits are the information.
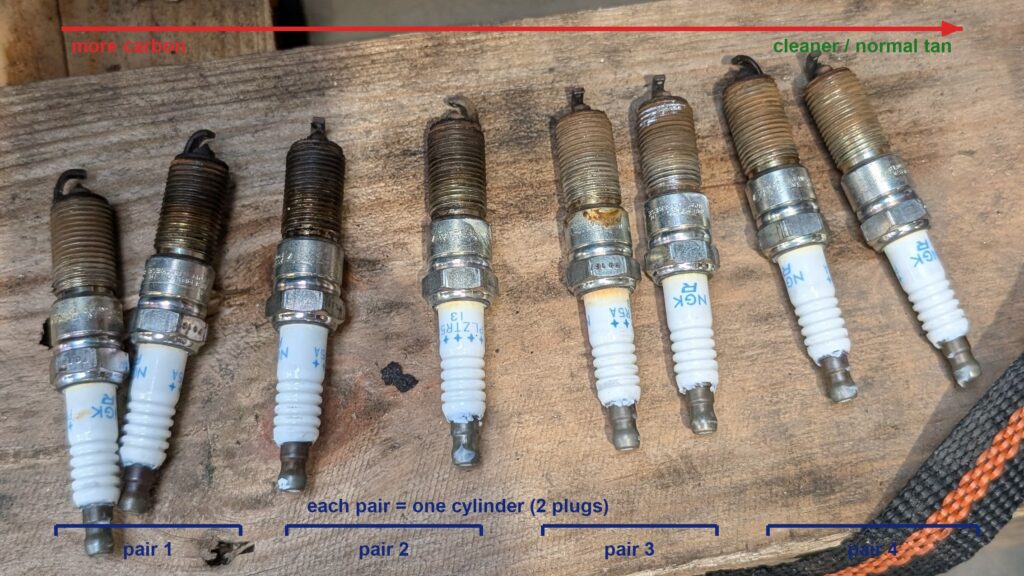
That’s exactly how the set below is arranged: four cylinders from one bank, each pair kept together, in the order they came out.
Reading the colour
You’re reading the firing end — the insulator nose, the centre electrode and the ground strap — not the metal shell. Here’s what the common looks mean:
- Light tan or grey: normal. This is a healthy plug in an engine that’s burning fuel cleanly and getting up to temperature.
- Dry, black, sooty: carbon fouling. Usually a rich mixture, a lot of idling and short trips, or weak ignition — the plug never gets hot enough to burn its deposits off.
- Wet, black, oily: oil reaching the chamber, past valve seals or rings. Look for a shiny or ashy deposit rather than dry soot.
- White, blistered insulator or a melted electrode: the warning sign. That’s overheating or detonation — too lean, too much timing, or the wrong heat range.
One thing that looks alarming but isn’t: the rusty-brown film on the threaded shells of some of these plugs. That’s just surface corrosion from a set of used plugs sitting around — it says nothing about how the cylinder was running.
What the colour does not tell you
It’s tempting to look at a gradient like the one in the photo and diagnose specific cylinders. Don’t — at least not from colour alone, and in my case I didn’t even record which plug came out of which hole, so I’m not going to pretend this row maps to particular cylinders. These were the original plugs on a used engine of unknown mileage, and I replaced the whole set on principle when it went into the Charger, not because anything was wrong. It’s run clean with no misfires ever since. A deposit pattern is a hint about tendencies, muddied by things like short-trip driving and light load. It is not a diagnosis.
If plug colour genuinely worries you, confirm it with real tests: a compression or leak-down test for a cylinder that reads oily, live fuel-trim data for a bank that looks rich, and the car’s stored trouble codes. A cylinder that’s actually misfiring will usually set a code — if you’re chasing one, our sister site autodtcs.com breaks down the P0300–P030x misfire codes and what each one points to.
The short version
- Why 16? Two plugs per cylinder for a complete burn of the HEMI’s wide chamber — cleaner, smoother, less knock.
- Which plug? NGK PLZTR5A-13, gapped 0.050 in from the box, torqued 11–15 lb-ft (never over 15) into aluminium heads, no anti-seize.
- Reading them: keep each cylinder’s pair together, read the firing end, tan is good, black is rich or oily, white is too hot.
- Should you reuse them? On a fresh swap, no — a set of platinum plugs is cheap insurance. Read the old ones, then fit new.
This engine went into a 2006–2010 Charger. If you’re working on the same car, it’s worth knowing how to reset the oil-change reminder after a service so the dash matches the work you’ve just done.
