These instructions apply to the Kia Stonic Mk1 (YB) 2017-Present.
For other models, please choose your vehicle here.
If the tyre-pressure (TPMS) warning has come on in your Kia Stonic (YB, 2017–present) after topping up the tyres, fitting winter wheels or a change in the weather, it usually just needs the pressures set correctly and the system told to relearn them. On most Stonics that means setting the pressures cold and then pressing and holding the TPMS SET button; some versions relearn on their own as you drive. Here are the correct pressures and how to clear the light.
Kia Stonic Tyre Pressures
The recommended cold tyre pressures for the Kia Stonic are 2.35 bar (34 psi) front and 2.15 bar (31 psi) rear for normal loads, rising at the rear when the car is fully laden. The exact figures depend on the fitted wheel size. These are read from the driver’s door-pillar label on a 2020 car — always set pressures to the label on your Stonic, as wheel size and market can change them.
| Tyre size | Load | Front | Rear |
|---|---|---|---|
| 185/65 R15 88H | Up to 3 occupants | 2.35 bar / 34 psi | 2.15 bar / 31 psi |
| Full load (5 + luggage) | 2.4 bar / 35 psi | 2.5 bar / 36 psi | |
| 205/55 R17 95V | Up to 3 occupants | 2.35 bar / 34 psi | 2.15 bar / 31 psi |
| Full load (5 + luggage) | 2.4 bar / 35 psi | 2.6 bar / 38 psi | |
| Temporary spare (T125/80 D15/D16) | Any | 4.2 bar / 60 psi | |
Set pressures cold, before driving. Add the extra rear pressure shown above only when carrying a full load of passengers and luggage.
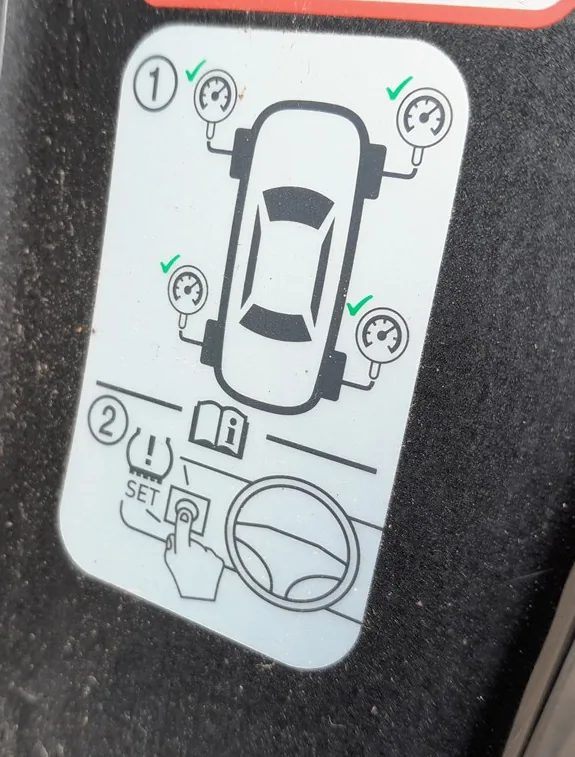
How the Stonic’s TPMS Works
Most Stonics use a system that learns the pressures you set as its new baseline when you press the TPMS SET button, then watches for a drop from there. After you correct the pressures you hold SET to store them, and a short drive confirms the new figures. On higher trims fitted with a sensor in each wheel, the car reads real pressures and can show which corner is low; those versions relearn automatically on the move and may not need the button.
Either way, a light that comes back soon after a reset points to a real cause — a genuinely soft tyre or a slow puncture — rather than a glitch.
First, a Few Checks
- Check the tyres cold — before driving, or a good while after the car has stood.
- Use the figures on the driver’s door-pillar label, matching a laden figure if you’re carrying a full load.
- Set all four corners, not just the one the dash is flagging, and check the spare if it’s a full-size wheel.
- Look over each tyre for an obvious nail or damage while the gauge is out.
- Plan a short steady drive afterwards — the system needs road speed to confirm.
How to Reset the Tyre Pressure Warning

- Set all four tyres to the correct cold pressure from the door-pillar label.
- Switch the ignition on (engine off is fine).
- Press and hold the TPMS SET button — the tyre-symbol button on the lower dash switch panel — until the TPMS warning light blinks to confirm it has stored the new pressures.
- Drive for about 10–20 minutes at a steady speed above 25 km/h (15 mph) so the system settles on the new baseline and the warning goes out.
On versions with a sensor in each wheel (a per-wheel pressure readout in the cluster) there may be no SET button — just set the pressures correctly and drive, and the system relearns automatically.
If the Light Stays On
- Re-check every tyre cold — one slightly low corner keeps the light on.
- Repeat the SET step if you have the button, making sure the light blinked to confirm, then drive again.
- Give it a longer drive — a very short trip may not be enough for the system to confirm.
- Cold weather can pull every tyre a few psi low overnight; top up cold and reset again.
- Suspect a slow puncture if one corner keeps dropping — find and fix the leak rather than re-driving.
- A steady-flashing TPMS light (about a minute at start-up) means a sensor fault — a flat sensor battery, or a sensor not matched after a wheel change — and needs a tyre shop’s tool.
Frequently Asked Questions
How do I reset the tyre pressure light on a Kia Stonic?
Set all four tyres to the correct cold pressure from the door-pillar label, switch the ignition on, then press and hold the TPMS SET button (the tyre-symbol button low on the dash) until the warning light blinks. Drive for about 10–20 minutes above 25 km/h (15 mph) and the light goes out. Versions with per-wheel sensors relearn automatically without the button.
Where is the TPMS SET button?
On the lower dash switch panel to the right of the steering column, below the ESC OFF button — it carries a tyre symbol with “SET”. The door-pillar label also points to it. Hold it after setting the pressures until the TPMS light blinks to confirm.
Why won’t the light go out after pumping the tyres up?
Either a tyre is still slightly off, you didn’t hold SET long enough for it to confirm, or the car needs a few more miles to settle. Re-check all four cold, press and hold SET until the light blinks, and drive a little further. A steady flash at start-up, rather than a solid light, means a sensor fault instead.
Do I need a tool?
No special tool is needed to set the pressures or reset the light — just an accurate gauge, an air line and the dash SET button. A diagnostic TPMS tool is only needed if a sensor itself has failed and has to be re-matched after a wheel or sensor change.
The light came on in cold weather — is that normal?
Yes. Air contracts as it cools, so a cold morning can lower every tyre enough to trip the warning even with no leak. Top each tyre back up to the label figure while cold, reset, and drive; the light should stay off once the real pressures are back to spec.
Does the display show which tyre is low?
Only on versions fitted with a sensor in each wheel — those can highlight the specific low corner and its pressure. Cars with the simpler system just give a single warning light, so set all four to spec, press SET and drive to clear it.
If a fault code is stored, look it up on autodtcs.com. To clear a service reminder, see our Stonic service reset.
Independent guide — not affiliated with Kia. Always follow your official service manual and safety precautions. Read our full disclaimer.