These instructions apply to the Kia Picanto Mk2 (TA) 2011-2017. For other models, please choose your vehicle here.
Last updated:
The Kia Picanto TA (2011–2017) is fitted with the standard 16-pin OBD-II diagnostic port required by EU regulations for any petrol or diesel passenger car. The connector accepts any generic OBD-II scan tool — Bluetooth dongles for smartphone apps, USB adapters for laptops, or dedicated handheld scanners — and on the Picanto it sits behind a small panel marked “FUSE OBD” on the driver’s side of the lower dashboard.
Where the OBD-II Port Is Located
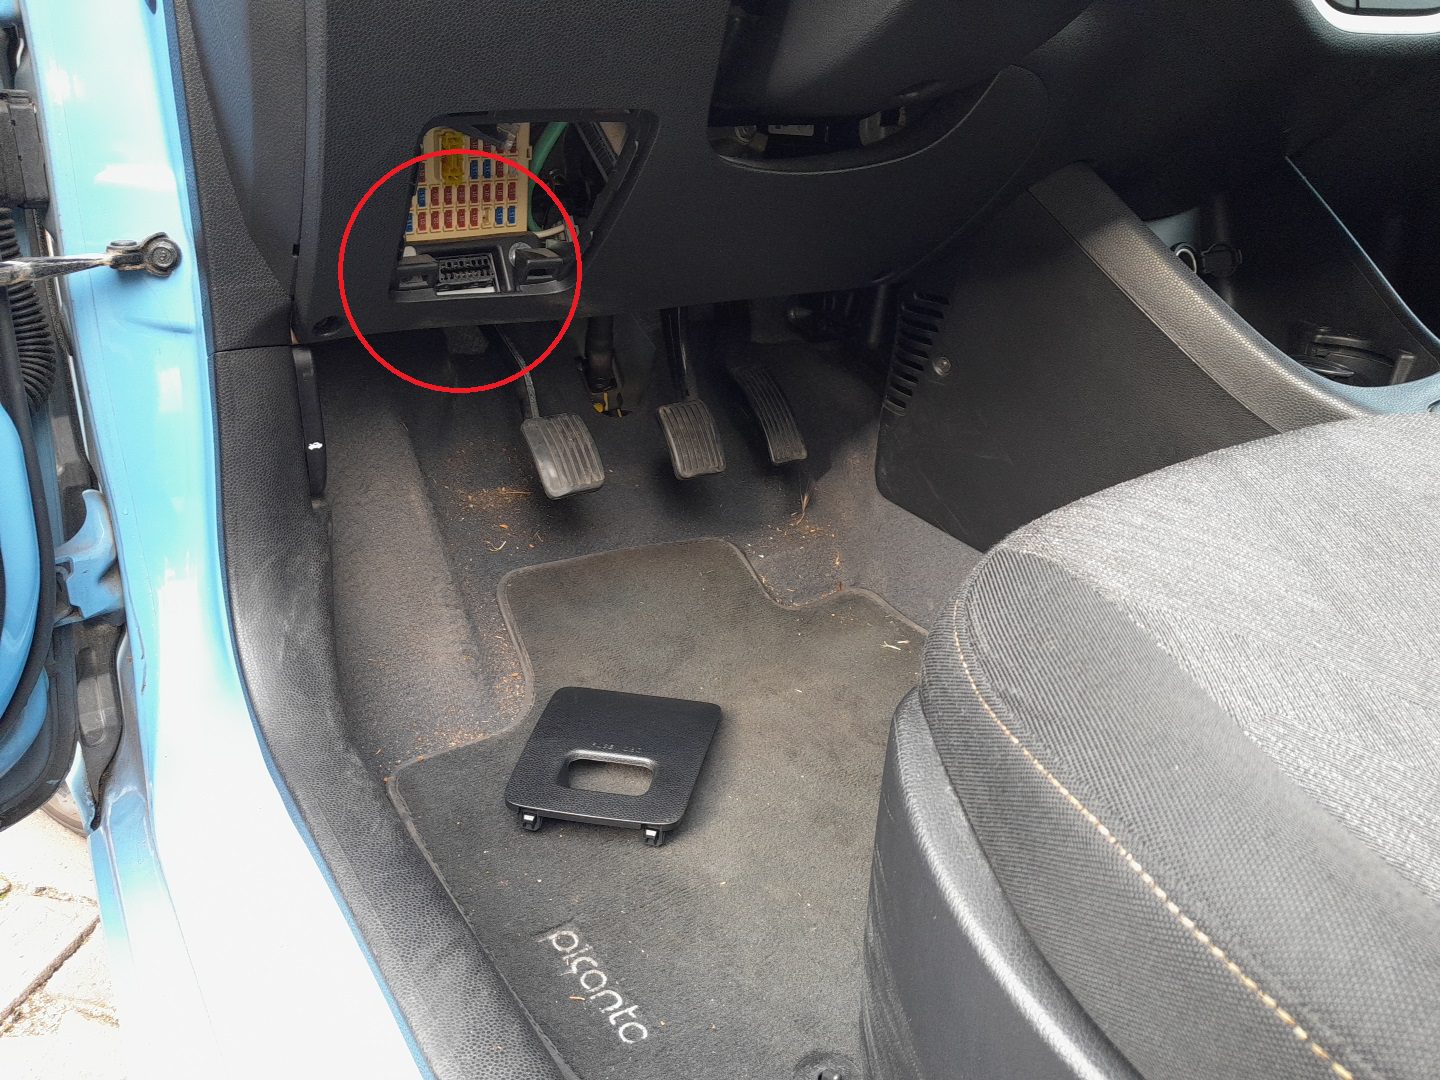
The diagnostic connector is mounted behind the fuse/relay panel cover directly below the steering column, just above the pedals. The label “FUSE OBD” is moulded onto the panel’s outer surface — there are no other markings, and the panel sits flush with the surrounding dashboard plastic.
Tools and Supplies
- An OBD-II adapter or scanner. Common choices:
- Bluetooth dongle (e.g. OBDLink MX+, Veepeak BLE) — pairs with apps like Torque Pro (Android) or Car Scanner ELM OBD2 (iOS).
- Wi-Fi dongle — useful for iPhones, which historically didn’t support classic Bluetooth OBD adapters.
- USB cable to ELM327 — for a laptop running ForScan, Torque, or vehicle-specific software.
- Dedicated handheld scanner (Autel, Foxwell, Launch X431) — supports live data, bi-directional commands, and resetting service indicators on the Picanto.
- A smartphone or laptop with appropriate diagnostic software, if you’re using a dongle rather than a self-contained scanner.
Accessing the Port — Step-by-Step
- Open the driver’s door and crouch so you can see the lower-dashboard area near the pedals.
- Identify the small panel marked “FUSE OBD” on the underside of the dash, just inboard of the steering column.
- Grip the panel at the sides (not the centre, which doesn’t flex) and pull it gently outward. The cover is held by three plastic clips — it should pop off with a firm but controlled pull.
- The OBD-II connector is positioned directly behind the panel, facing downward toward the floor.
- Switch the ignition to ON (engine off is fine for code reading; engine running needed for live data).
- Plug the OBD-II adapter into the port — the trapezoidal connector shape ensures it only fits one way. A firm push seats it fully.
- Pair the adapter with your phone/laptop per the adapter’s instructions, or power up your handheld scanner.
- After diagnostics, unplug the adapter, hold its body (not the cable) while removing.
- Refit the FUSE OBD cover by aligning the clips and pressing back into place. A flush refit protects the port from dust and accidental contact with feet or knees.
What You Can Read on the Picanto
- Generic OBD-II data: any scanner can read engine fault codes (P0xxx, P02xx etc.), live engine RPM, coolant temp, MAF, O2 sensor voltages, freeze-frame data.
- Body and chassis codes: Kia-specific scanners (Autel MaxiCheck, Launch X431, Foxwell NT530 with Kia license) can also read ABS, airbag, BCM, ISG and TCM codes.
- Service indicator reset: the DTC database at autodtcs.com lists Picanto codes if you need to interpret what your scanner shows. For the indicator-light reset itself, the manual menu procedure is faster than a scan tool on this generation.
- Battery state of charge (ISG-equipped trims): via the dedicated battery sensor on the negative terminal.
Safety Tips
- Switch the ignition to ON before connecting. Hot-plugging an adapter on a running car can occasionally trigger CAN-bus errors that need a battery reset to clear.
- Support the connector with your hand while inserting or removing the adapter — pulling on a dangling adapter can stress the port’s solder joints.
- Don’t leave a Bluetooth/Wi-Fi dongle plugged in long-term unless it has a sleep mode — even when “idle,” many cheap dongles draw 30–50 mA, which can flatten the battery over weeks of unused car.
- After diagnostics, always refit the FUSE OBD cover. The port faces downward and is exposed to road grit if left open, and the surrounding fuses are at the same level as the cover.
Troubleshooting
- Adapter plugs in but the scanner won’t connect. Check the ignition is in ON, not ACC. The Picanto’s OBD-II port is only powered with ignition above ACC position.
- Bluetooth dongle pairs but can’t read codes. Try ignition OFF, wait 30 seconds, ignition ON, retry. Some dongles need a fresh CAN-bus wake-up after the engine has been running.
- Cover won’t refit cleanly. Check the clips on the back of the cover — they’re brittle on older Picantos. If a clip has broken, a strip of double-sided automotive tape on the back of the cover holds it perfectly well.
- Scanner shows “vehicle not supported.” The Picanto TA pre-dates some scanners’ default databases. Update the scanner’s firmware, or use a generic OBD-II app (Torque Pro / Car Scanner) which doesn’t depend on a model-specific database for basic code reading.
Frequently Asked Questions
Can I leave a Bluetooth OBD dongle plugged in all the time?
You can, with caveats. Decent dongles (OBDLink MX+, Veepeak Mini) draw under 5 mA in sleep and are fine to leave plugged in. Cheap unbranded dongles often draw 30–50 mA continuously and will flatten the Picanto’s battery in a few weeks of non-use. Test yours with a multimeter if uncertain — a healthy idle draw is under 10 mA.
Will plugging in an OBD scanner void my warranty?
The 2011–2017 Picanto is well outside warranty now, so this is mostly moot. For cars still in warranty, plugging in a read-only scanner doesn’t void anything. Performance “tuning” boxes that re-flash the ECU are a different matter and can absolutely void powertrain warranty.
Why is the port hidden behind a cover instead of in plain view?
EU regulations require the port to be accessible without tools, but they don’t require it to be permanently exposed. Kia chose to put it behind a flush cover for aesthetic reasons and to protect it from dust ingress. The “FUSE OBD” label is the regulatory cue that this is where to look.
Does the Picanto JA (2017+) use the same port location?
The Picanto JA also has a 16-pin OBD-II port in a similar location (left side of the lower dash on RHD; right side on LHD). The exact cover and panel layout is slightly different — the JA uses a less prominent label. See the Picanto JA guides for vehicle-specific details on the newer generation.
Disclaimer: The information on this page is provided for general guidance only. Always follow your official service manual and safety precautions when working on your vehicle. We are not responsible for errors, omissions, or any damage resulting from the use of this information.
This website is an independent resource and is not affiliated with, endorsed by, or sponsored by Kia. All trademarks and brand names belong to their respective owners.