These instructions apply to the Toyota C-HR Mk1 (XW10) 2016-2023.
For other models, please choose your vehicle here.
The Toyota C-HR (Mk1/AX10, 2016–2023) has two hidden self-checks you can reach without a scan tool: an engineer’s Diagnosis Check service menu behind the central display, and a gauge self-test that sweeps the instrument cluster. This guide covers how to open both and what each one shows. On the hybrid, start with a healthy 12 V auxiliary battery — these menus run at IGNITION ON rather than READY, so the small aux battery does all the work and a tired one will drain further while you navigate.
Open the head-unit Diagnosis Check menu
This menu lives behind the central multimedia display and is reached with a headlight-switch trick rather than the normal settings. It reports module status, reads live vehicle data and can fire individual actuators.
- Sit in the car with everything switched off and your foot off the brake pedal. Set the headlight switch to ‘0’ (off) if it is on AUTO.
- Press the ENGINE START STOP button once, without the brake, to reach IGNITION ON — the electronics wake but the hybrid system stays off.
- Wait for the instrument cluster and the central display to finish loading.
- Press and hold the display/setup button at the bottom-right of the instrument-cluster display.
- While still holding it, turn the headlight switch to low beam (dipped) and back to ‘0’. Repeat that on–off cycle three times at a steady pace.
- Release the button. The Diagnosis Check service menu opens on the central display.
What the Diagnosis Check menu shows
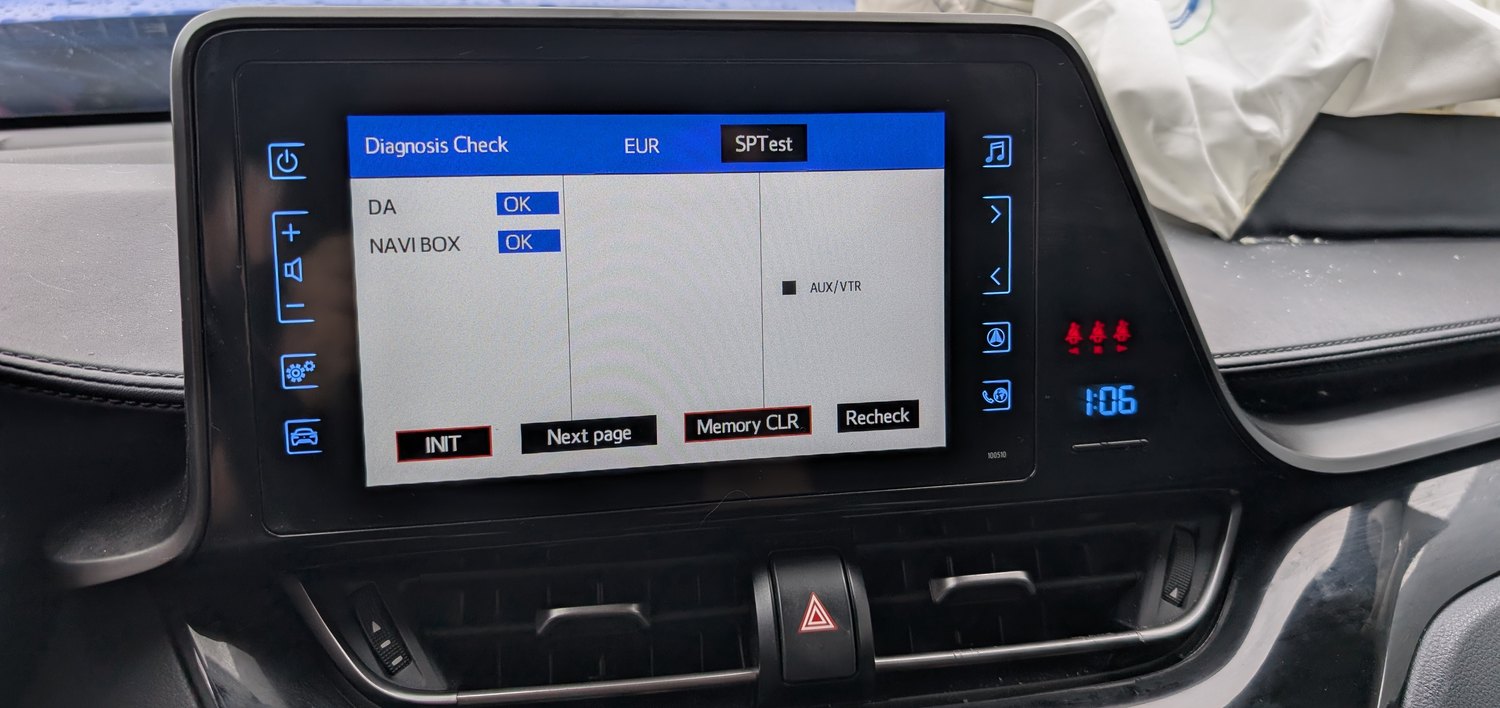
The opening Diagnosis Check screen lists the connected modules — DA (display audio) and NAVI BOX — with an OK status against each, plus an SPTest tab and options such as Memory CLR, Recheck and Next page. It is the quickest confirmation that the head unit and its navigation module are talking to each other.
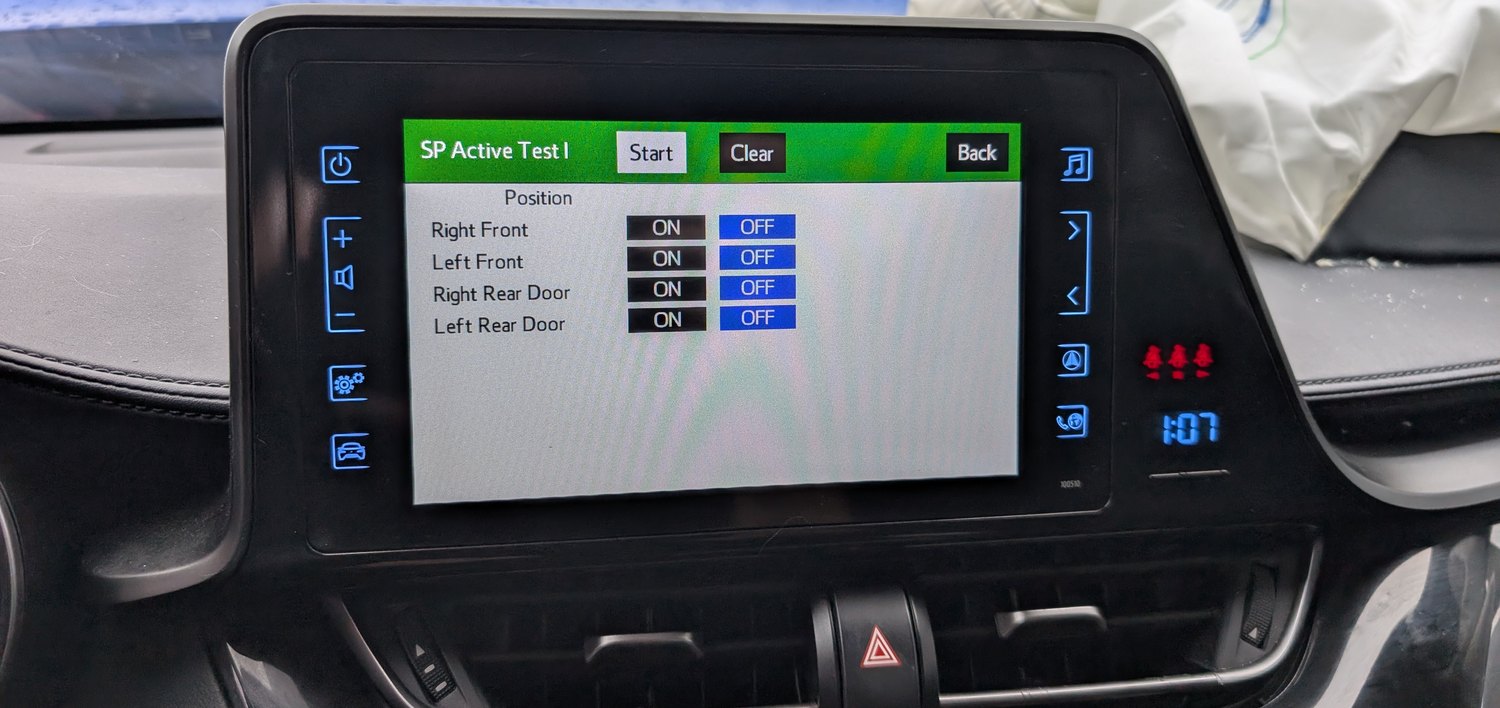
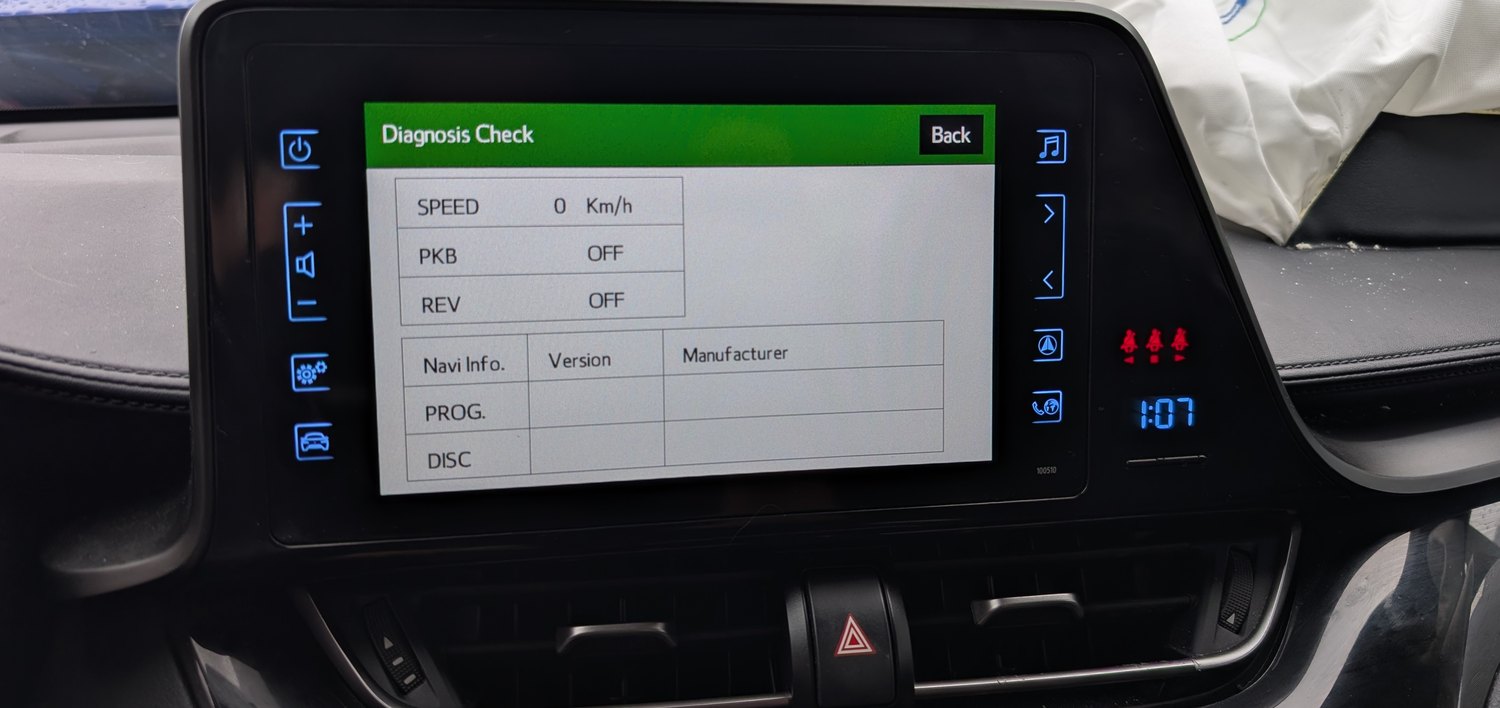
The SP Active Test screen turns those checks into outputs: it lets you switch each door-lock actuator on and off individually — Right Front, Left Front, Right Rear and Left Rear — so you can prove a specific lock motor works before condemning it. A second Diagnosis Check page reads live vehicle signals: SPEED, PKB (parking-brake status), REV (reverse-gear signal) and the navigation version and manufacturer fields.
The cluster gauge (meter) self-test
The second hidden check is Toyota’s combination-meter “operation check”, run entirely from the instrument cluster. When entered, the speedometer needle (and the tachometer pointer where fitted) drives from its rest stop to full scale and back, every LCD segment lights — odometer, trip display, the multi-information block — and the warning icons flash on together so a failed LED stands out. It is the quickest no-tool way to separate a genuine gauge or sensor fault from a simple dead segment or burnt-out indicator.
- Sit in the car fully switched off, with your foot OFF the brake pedal, and the meter showing the odometer rather than a trip reading.
- Press and hold the trip/display reset switch — the “TRIP” control you normally use to cycle ODO, TRIP A and TRIP B.
- Keeping it held, press ENGINE START STOP twice without touching the brake. The first press gives accessory mode, the second reaches IGNITION ON — the warning-light state with the engine and hybrid system still off.
- Hold the reset switch for another second or two as the cluster powers up, then release.
The cluster runs its self-test: the needle(s) sweep to maximum and return, the LCD floods every segment, and the warning symbols cycle. Any pointer that stalls, a blank patch on the screen or a lamp that never lights identifies the faulty element.
How to exit
For either check, press ENGINE START STOP once to power everything down. The car returns to normal at the next ignition-on. Both modes are for checking only — they change no settings, reset no trip totals and touch no service-interval counter.
Frequently Asked Questions
What’s the difference between the two menus? The Diagnosis Check menu lives in the central display and reports module status, live data and actuator tests. The gauge self-test lives in the instrument cluster and simply exercises the needles, LCD segments and warning lamps. Different access, different purpose.
Does this work on the C-HR Hybrid? Yes. The 1.8 hybrid and 1.2 turbo share the same display-audio hardware and AX10 cluster, so both procedures are identical — on the hybrid the power gauge sweeps in place of a rev counter during the self-test.
The headlight trick isn’t opening the Diagnosis Check menu. Start from the headlights at ‘0’, keep the display button held the whole time, and make each low-beam/off cycle deliberate — three clean cycles. Rushing the flicks is the usual reason it doesn’t catch.
The needle sweeps but one warning lamp never lights — is that a problem? Usually a single failed LED in that indicator. The gauge logic is fine; only that lamp needs attention.
Will either mode clear the Maintenance light or fault codes? No. They only check the display, cluster and body actuators; neither reads or clears engine trouble codes. For those you need an OBD-II scanner on the dash port, and you can decode what a code means on autodtcs.com.
Can running these tests damage anything? No. The car stays in IGNITION ON only, the engine never cranks, and both are designed-in factory diagnostics — just operate only the outputs you recognise in the active-test screen.
If a self-test reveals a genuine warning rather than a dead segment, decode the underlying trouble code at autodtcs.com before booking any repair.
Independent guide — not affiliated with Toyota. Always follow your official service manual and safety precautions. Read our full disclaimer.