These instructions apply to the Suzuki Swift Mk2 (RS) 2004-2010.
For other models, please choose your vehicle here.
The engine air filter on the Suzuki Swift Mk2 (RS413 / RS415 series, 2004–2010) keeps dust and grit out of the engine. A clogged element chokes airflow, blunting throttle response and fuel economy. On the 1.3 M13A and 1.5 M15A petrol models the airbox sits at the top-left of the engine bay and opens by hand, so this is a 10-minute job with no tools.
When to Replace the Swift’s Air Filter
Suzuki inspects the air cleaner element at every service (roughly every 15,000 km / 9,000 miles or 12 months) and replaces it by 30,000 km (18,000 miles) under dusty “severe” conditions. A good rule of thumb: check it yearly and replace it once it looks dirty or at about 30,000 km.
Inspect it sooner if you drive on dusty, sandy, or unsealed roads, or if you notice weaker acceleration, higher fuel use, or visible dirt when you hold the element up to the light.
Tools & Parts Needed
- New air filter element (Suzuki OEM or a quality equivalent for the 1.3 / 1.5 Swift)
- A clean rag
- No tools required — the cover is held by spring clips
How to Check and Replace the Air Filter
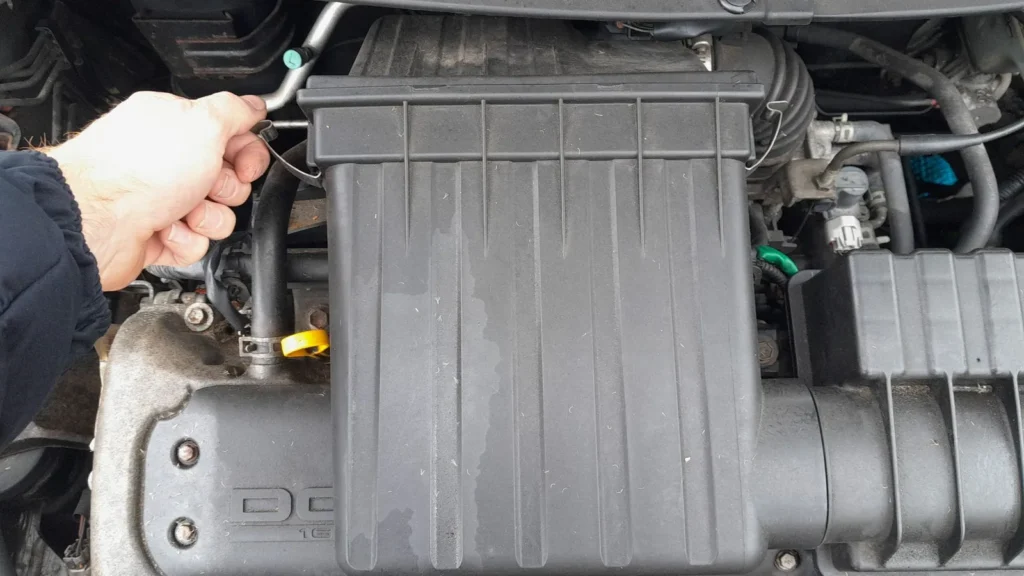
- Find the airbox. Open the hood. The air cleaner is the large ribbed black plastic box at the top-left of the engine bay, with the intake duct running from its right side toward the throttle body.
- Unclip the cover. Release the metal spring clips around the edge of the box — they unhook by hand, no tools needed. On the M13A / M15A there are no cover screws; any bolts you see hold the whole airbox down and do not need to come out. Lift the cover to expose the element.

Unhook each wire spring clip by hand — no tools are needed to open the cover. With the clips undone and the cover lifted, the paper filter sits in the lower housing — lift it straight up and out. - Inspect the element. Note which way up the filter sits, then lift it out and hold it up to a light. If light barely passes through, or it is gray with dust, leaves, or grit, replace it.
The flat rectangular paper element lifts straight out — hold it to the light to judge how dirty it is. - Fit the new filter. Drop the new element into the housing the same way round as the old one, with the rubber seal facing up. Press the gasket fully into the groove all the way around so no unfiltered air can bypass it.
- Close the airbox. If the cover locates with tabs along one edge, hook those in first, then lower the opposite edge and re-hook every spring clip until it seats. Check that the lid sits flush and the intake duct is still firmly connected.


Tips for a Longer-Lasting Filter
- Glance at the element at each oil change — it is a 30-second check.
- You can tap loose dust out of a lightly soiled paper element, but never wash or oil a paper filter.
- Always fit the correct element for your engine; a wrong-size or poorly seated filter lets grit slip past.
Frequently Asked Questions
Do I need any tools to change the Suzuki Swift’s air filter?
No. On the 1.3 M13A and 1.5 M15A petrol Swift the airbox cover is held by metal spring clips that unhook by hand, so the element comes out in a couple of minutes.
How often should the Suzuki Swift air filter be replaced?
Suzuki inspects it at every service and replaces it by 30,000 km (18,000 miles) in dusty conditions. Inspect it yearly and fit a new one once it is clogged or gray throughout.
What type of air filter does the Swift use?
A flat rectangular pleated-paper panel element with a rubber sealing frame. Use a genuine Suzuki element or a quality equivalent that matches your engine — do not substitute a different size.
Can I clean and reuse the paper air filter?
You can tap out loose surface dust between changes, but paper elements should not be washed or oiled. Once it is clogged or gray throughout, fit a new one.
⚠️ Disclaimer: This guide is for general information only. Always follow your vehicle’s official owner’s manual or a qualified mechanic before carrying out maintenance. ServiceReset.net is not affiliated with Suzuki Motor Corporation or any other manufacturer.
Independent guide — not affiliated with Suzuki. Always follow your official service manual and safety precautions. Read our full disclaimer.