These instructions apply to the Suzuki Ignis Mk3 (ATK) 2016-Present.
For other models, please choose your vehicle here.
Disconnecting the 12 V battery on a Suzuki Ignis Mk3 (ATK, 2016–present) is a routine job for a battery change or before electrical work. Two things are worth knowing first: where the battery actually lives (it varies by model), and that Smart Hybrid (SHVS) versions have a small extra battery that needs a little care. This guide covers the safe order of work.
Where the Battery Is
The 12 V starter battery (the one you disconnect) sits in different places depending on model, so locate yours first (the handbook shows it):
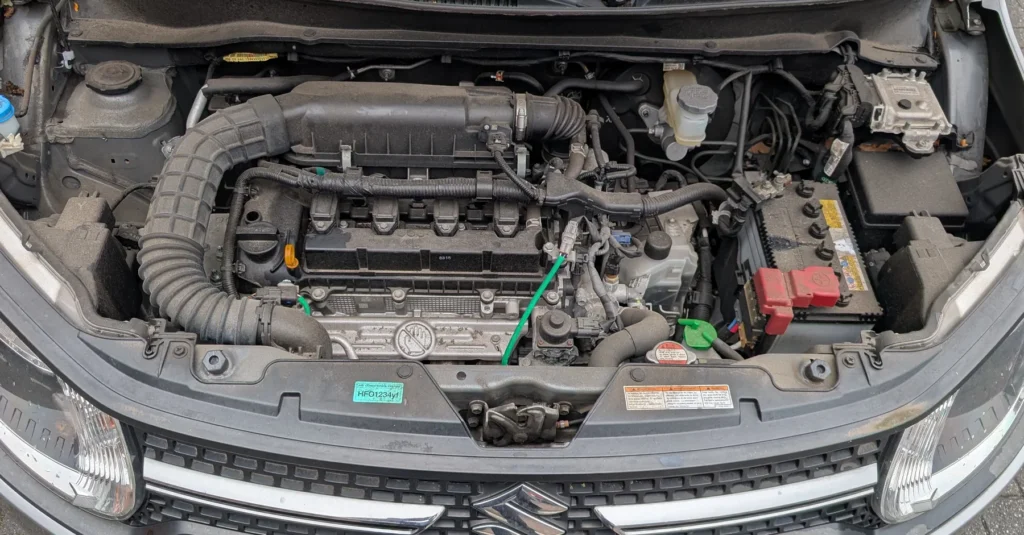
- Non-hybrid Ignis: the 12 V battery is in the engine bay.
- Smart Hybrid (SHVS) Ignis: the 12 V battery is relocated to the boot.
Don’t confuse it with the unit under the front seat. The small lithium-ion pack under a front seat is the SHVS mild-hybrid battery, not the 12 V starter battery — leave that one alone (Suzuki’s renewal procedure for it involves removing the seat, and it’s best left to a specialist). For routine battery work you only ever touch the 12 V battery.
If you are renewing it, fit a like-for-like 12 V battery — SHVS cars use an enhanced (EFB-type) battery, so match the original.
Before You Disconnect
- Note your radio code and presets.
- Turn the ignition off and make sure all electrical consumers are off.
- After switching off, wait 3 minutes before disconnecting — this lets the modules (and the mild-hybrid system) power down.
- SHVS Smart Hybrid cars: the SHVS system is a 12 V mild hybrid (an integrated starter-generator with a small lithium-ion battery). It is not a high-voltage car, but wear gloves and don’t poke around the SHVS battery’s own cabling — the routine 12 V terminal work below is owner-safe.
Disconnecting — Correct Order
- Turn the ignition off and wait 3 minutes.
- Reach the 12 V battery in the engine bay and lift its cover. On SHVS mild-hybrid cars the 12 V lead-acid battery is still in the engine bay — only the separate lithium-ion pack sits under the front passenger seat, and you do not disconnect that.
- Slacken the negative (−, earth) terminal first and lift the lead clear.
- Only undo the positive (+) terminal if you are removing the battery completely.
Reconnecting — Correct Order
- Connect the positive (+) lead first, then the negative (−) earth lead last. Tighten both firmly and refit any cover.
- Turn the ignition on for a few seconds before starting the engine.
What to Reset Afterwards
- Reset the date and time and re-enter your radio code and presets.
- Re-initialise the power windows — one-touch won’t work until re-taught (see our window initialise guide).
- Re-check the tyre-pressure system if the light comes on (see our TPMS reset guide).
- The start/stop system may stay dormant until the battery is charged — normal for the first drive.
If a Warning Light Stays On
One or two lights right after reconnecting is normal. If the airbag, ABS or engine light stays on, a fault code was logged — reading it needs an OBD scanner, and you can look up what a Suzuki code means on autodtcs.com.
Frequently Asked Questions
Where is the battery on a Suzuki Ignis?
The 12 V starter battery is in the engine bay on non-hybrid cars and in the boot on Smart Hybrid (SHVS) cars. The unit under a front seat is the separate SHVS lithium-ion pack — not the battery you disconnect. Check your handbook to confirm.
Is the SHVS Ignis a high-voltage hybrid?
No — SHVS is a 12 V mild-hybrid system (a beefed-up starter-generator and a small lithium battery). It is not a high-voltage vehicle, but treat the SHVS battery’s own wiring with care.
Do I need to register a new battery?
No dealer coding is required for the 12 V battery. Fit the correct type and follow the order above.
Why wait 3 minutes?
It lets the control modules and the mild-hybrid system power down cleanly so nothing is mid-write when power is cut.
To clear the service reminder after maintenance, see our Suzuki Ignis service indicator reset guide.
Independent guide — not affiliated with Suzuki. Always follow your official service manual and safety precautions. Read our full disclaimer.